<VirtualHost *:443>
  ServerName deid.datatailor.be
  SSLEngine On
  Include /etc/letsencrypt/options-ssl-apache.conf
  SSLCertificateFile /etc/letsencrypt/live/deid.datatailor.be/fullchain.pem
  SSLCertificateKeyFile /etc/letsencrypt/live/deid.datatailor.be/privkey.pem
  ##
  ## General proxy settinggs
  ##
  <Proxy *>
    Require all granted
  </Proxy>
  ## Settings needed for Minio
  ProxyPreserveHost On
  ProxyVia Block
  RemoteIPHeader X-Forwarded-For
  ##
  ## Put Web applications using ShinyProxy at path /apps/
  ## Put Inception at path /inception/
  ## Put a local Prefect Server UI  at path /automation/
  ## Put a local Prefect Server API at path /prefect-server/
  ## Put API using FastAPI at path /API/, visit /API/docs to get the documentation
  ## Put Minio at path /s3/
  ##  - 9001/9901 is the WebUI of Minio
  ##  - 9000/9900 is the API of Minio
  ## Note: Sequence is important here as minio S3 API is always running at the root of the domain
  ##
  RewriteEngine on
  ## Web apps
  RequestHeader set "X-Forwarded-Proto" expr=%{REQUEST_SCHEME}
  RewriteCond %{HTTP:UPGRADE} =websocket
  RewriteRule /apps/(.*) ws://127.0.0.1:8280/apps/$1 [P,L]
  RewriteCond %{HTTP:UPGRADE} !=websocket
  RewriteRule /apps/(.*) http://127.0.0.1:8280/apps/$1 [P,L]
  ## Inception
  RewriteCond %{HTTP:UPGRADE} =websocket
  RewriteRule /inception/(.*) ws://localhost:8180/inception/$1 [P,L]
  RewriteCond %{HTTP:UPGRADE} !=websocket
  RewriteRule /inception/(.*) http://localhost:8180/inception/$1 [P,L]
  ## If you run a local prefect
  RewriteCond %{HTTP:UPGRADE} =websocket
  RewriteRule /automation/(.*) ws://127.0.0.1:4200/automation/$1 [P,L]
  RewriteCond %{HTTP:UPGRADE} !=websocket
  RewriteRule /automation/(.*) http://127.0.0.1:4200/automation/$1 [P,L]
  RewriteCond %{HTTP:UPGRADE} =websocket
  RewriteRule /prefect-server/(.*) ws://127.0.0.1:4200/prefect-server/$1 [P,L]
  RewriteCond %{HTTP:UPGRADE} !=websocket
  RewriteRule /prefect-server/(.*) http://127.0.0.1:4200/prefect-server/$1 [P,L]
  ## API
  RewriteCond %{HTTP:UPGRADE} =websocket
  RewriteRule /API/(.*) ws://127.0.0.1:8380/API/$1 [P,L]
  RewriteCond %{HTTP:UPGRADE} !=websocket
  RewriteRule /API/(.*) http://127.0.0.1:8380/API/$1 [P,L]
  ## Ollama
  RewriteCond %{HTTP:UPGRADE} =websocket
  RewriteRule /ollama/(.*) ws://127.0.0.1:11434/$1 [P,L]
  RewriteCond %{HTTP:UPGRADE} !=websocket
  RewriteRule /ollama/(.*) http://127.0.0.1:11434/$1 [P,L]
  ## Minio
  RewriteCond %{HTTP:UPGRADE} =websocket
  RewriteRule /s3/(.*) ws://localhost:9901/$1 [P,L]
  RewriteCond %{HTTP:UPGRADE} !=websocket
  RewriteRule /s3/(.*) http://localhost:9901/$1 [P,L]
  RewriteCond %{HTTP:UPGRADE} =websocket
  RewriteRule /(.*) ws://localhost:9900/$1 [P,L]
  RewriteCond %{HTTP:UPGRADE} !=websocket
  RewriteRule /(.*) http://localhost:9900/$1 [P,L]
</VirtualHost>Security
Authentication
There are several other ways to extend the authentication from simple password based authentication to more integrated authentication methods. The different components allow
- Inception: OIDC, LDAP, SAML, simple, external pre-authentication
- Frontend apps with ShinyProxy: OIDC, LDAP, SAML, simple, external pre-authentication, none
- Minio: provide the user/password as set in environment variables at container start, further users can be made in the Minio frontend
- API: provide the user/password as set in environment variables at container start
It is advised to put an Apache webserver which hosts your domain (e.g. https://deid.yourcompany.eu/) and extend the reverse proxy shown above where you integrate the authentication with the OIDC compliant mod_auth_openidc plugin. For support on setting this up, get in touch. An example of this setup is shown below.
SSL with a reverse proxy
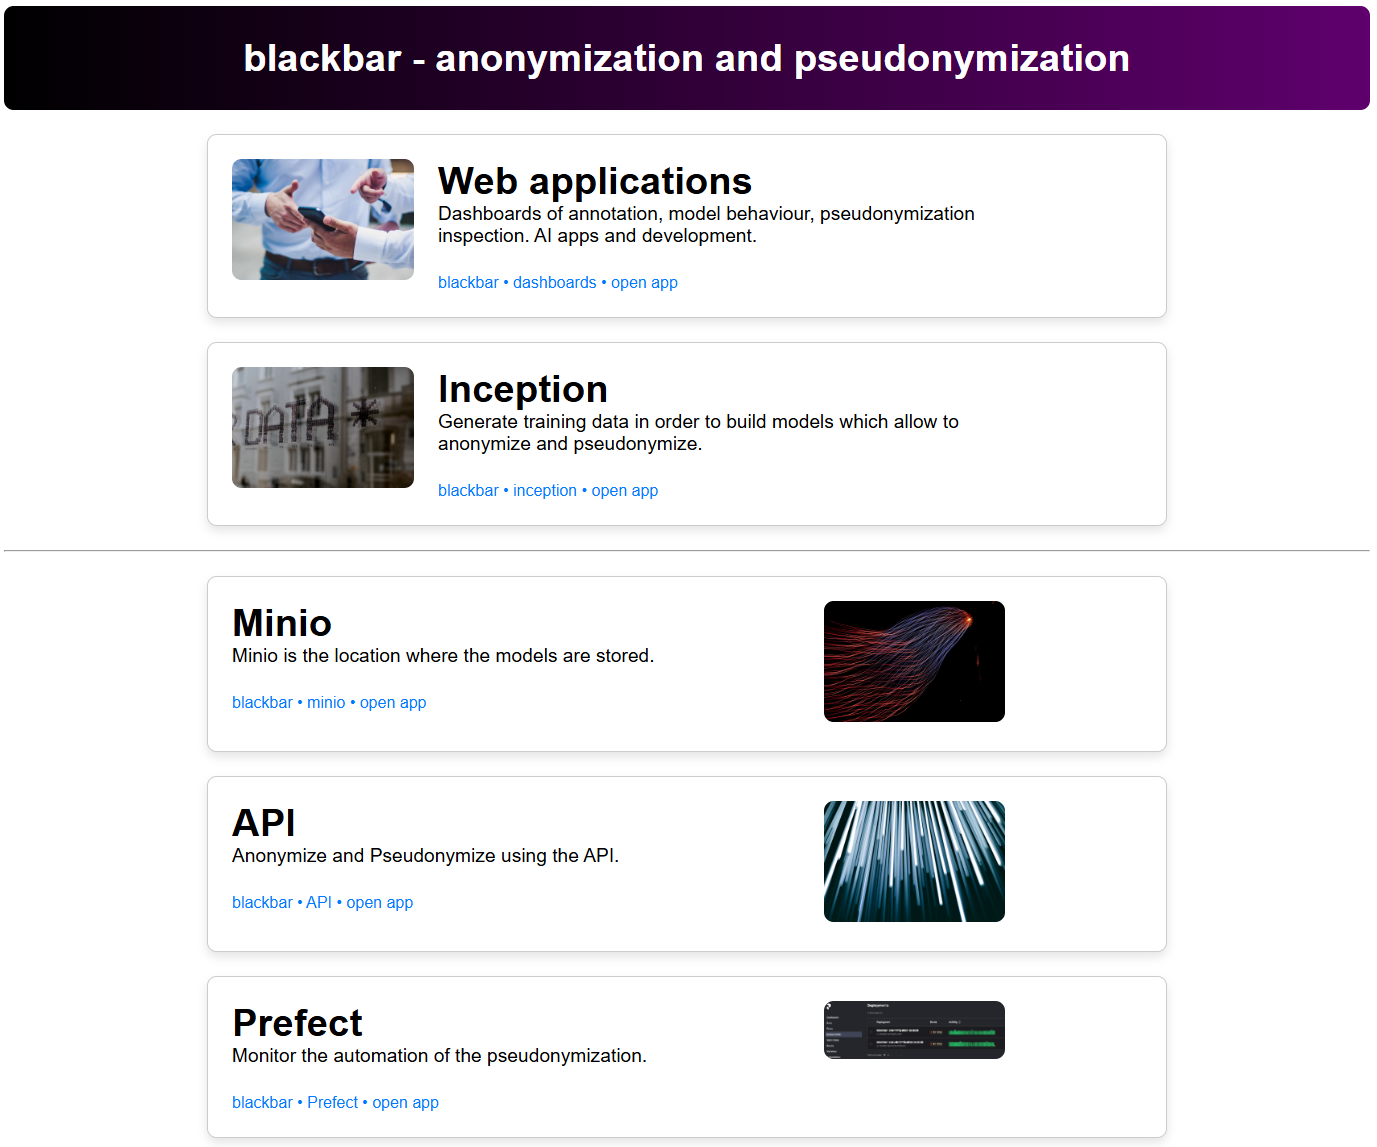
You can run the docker containers behind a reverse proxy to offload the SSL hosting as shown below. The below Apache configuration puts
- Inception available under the url https://your.domain.name/inception/
- Minio at https://your.domain.name/s3/
- The blackbar webapps at https://your.domain.name/apps/
- The API at https://your.domain.name/API/API/docs
- Sets an Ollama webservice at https://your.domain.name/ollama/
If you define the Apache configuration as follows at /etc/apache2/sites-available/deid.conf where you have obtained SSL certificates from you local institution or from Letsencrypt.
Make sure you have enabled the Apache modules
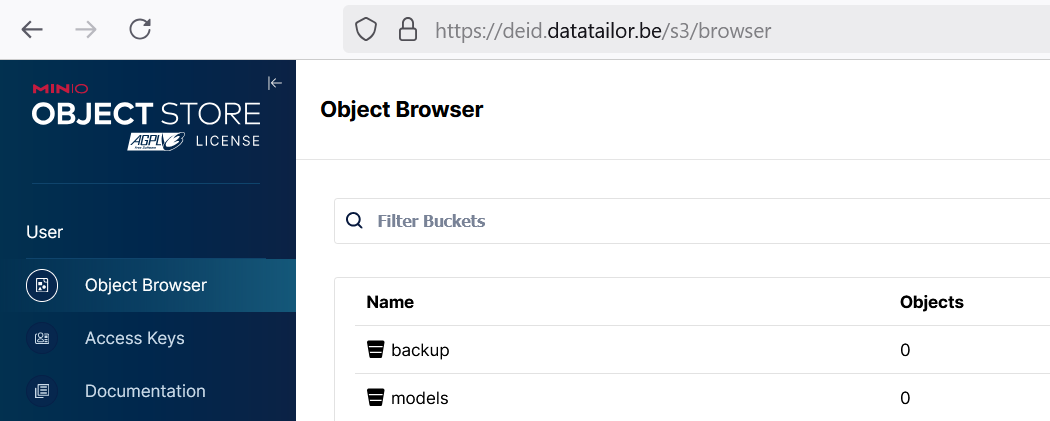
sudo a2enmod ssl rewrite headers proxy proxy_http proxy_wstunnel proxy_html proxy_ajp remoteipYou can start up Apache and this will make the Minio environment available in the example at https://deid.datatailor.be/s3/ and Inception at https://deid.datatailor.be/inception/
sudo a2ensite deid
sudo apache2ctl configtest
sudo service apache2 restart
If you do this, you need to set the environment variable MINIO_BROWSER_REDIRECT_URL when launching the blackbar-apps-inception container such that the Minio console knows that it’s running behind a reverse proxy.
docker run -d --name blackbar-apps-inception \
    -p 9901:9001 \
    -p 9900:9000 \
    -p 8180:8080 \
    -v $(pwd)/s3:/data \
    -v $(pwd)/inception:/export \
    -e MINIO_BROWSER_REDIRECT_URL="https://deid.datatailor.be/s3/" \
    --restart always \
    --env-file .env \
    ghcr.io/bnosac/blackbar-inception-minio
By default that creates an admin user which can then create further users. If you want integrated OIDC authentication, as shown below, you can set the environment variable INCEPTION_AUTHENTICATION to preauth in .env, indicate in which header name the remote principal user will be passed on (INCEPTION_PREAUTH_HEADER) and provide 1 user name as admin user (INCEPTION_PREAUTH_ADMIN) - this is the user from your OIDC integration.
INCEPTION_AUTHENTICATION=preauth
INCEPTION_PREAUTH_HEADER=remote_user
INCEPTION_PREAUTH_ADMIN=jwijffels
OIDC authentication
You can use the OIDC compliant mod_auth_openidc plugin to dispatch the authentication to e.g. Keycloak of Microsoft Entra ID by adding the following to the Apache configuration.
Make sure you install the mod_auth_openidc plugin by getting the released binary. E.g. on Ubuntu Jammy.
sudo apt install libcjose0 libhidredis0.14
sudo dpkg -i libapache2-mod-auth-openidc_2.4.18-1.jammy_amd64.deb
Alongside Keycloak
The example below uses Keycloak and puts the apps and Inception behind authentication governed by groups in Keycloak.
  ##
  ## Authentication using Keycloak
  ##
  OIDCProviderMetadataURL https://deid.yourcompany.eu/auth/realms/deid/.well-known/openid-configuration
  OIDCRedirectURI https://deid.yourcompany.eu/apps/secure
  OIDCCryptoPassphrase XXXXXXXXXXXXXXXXXXXXXX
  OIDCClientID blackbar-client
  OIDCRemoteUserClaim preferred_username
  OIDCAuthNHeader remote_user
  OIDCInfoHook userinfo
  OIDCSessionInactivityTimeout 28800
  OIDCSessionMaxDuration 28800

  <Location ~ "/apps*">
    AuthType openid-connect
    Require valid-user
  </Location>
  <Location ~ "/apps/app/rstudio*|/apps/app/vscode*">
    AuthType openid-connect
    Require claim klant:blackbar-admin
    Require claim klant:blackbar-developer
  </Location>
  <Location ~ "/apps/app/anonymization-inspection*|/apps/app/pseudonymization-inspection*|/apps/app/blackbar-cockpit*">
    AuthType openid-connect
    Require claim klant:blackbar-admin
    Require claim klant:blackbar-developer
    Require claim klant:blackbar-user
  </Location>
  <Location ~ "/apps/app/blackbar-patients-document-chat*">
    AuthType openid-connect
    Require claim klant:blackbar-admin
    Require claim klant:blackbar-developer
    Require claim klant:blackbar-user
    Require claim klant:blackbar-patients-document-chat
  </Location>
  <Location ~ "/inception(?!/api).*">
    AuthType openid-connect
    Require valid-user
  </Location>
  <Location ~ "/automation/prefect*">
    AuthType openid-connect
    Require claim klant:blackbar-admin
    Require claim klant:blackbar-developer
  </Location>
Alongside Microsoft Entra ID
If you have an existing Microsoft Entra ID setup, you can perform the authentication using it with the following integration alongside mod_auth_openidc.
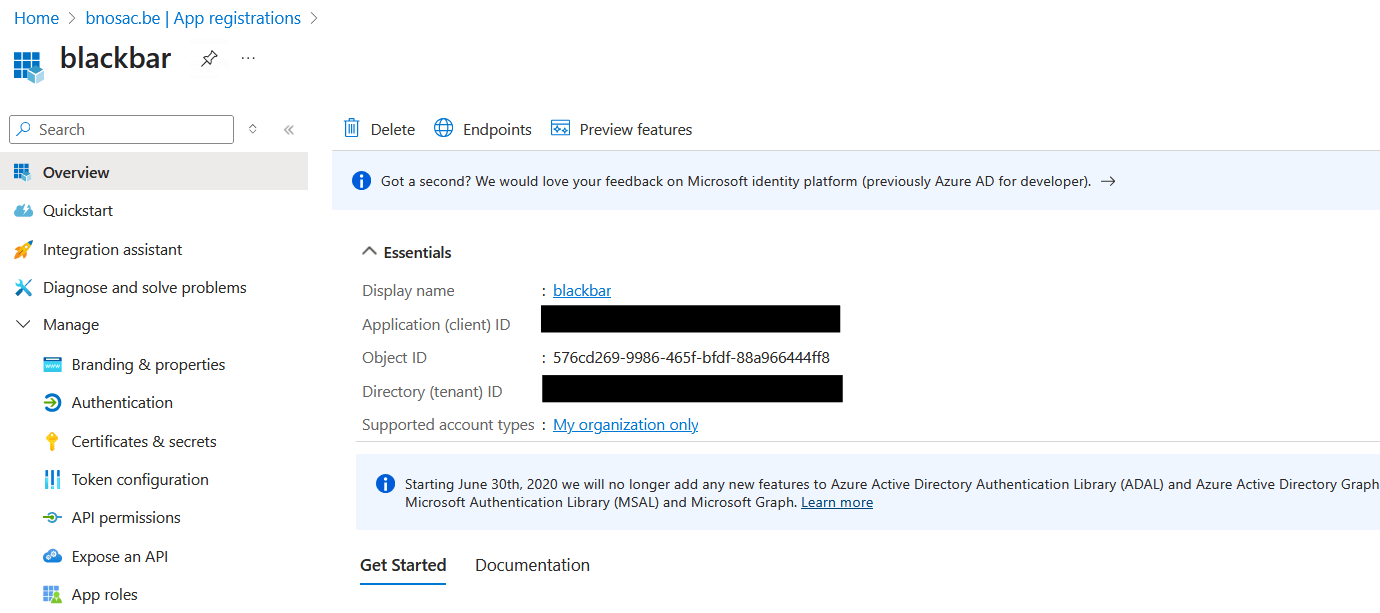
For this, in Entra ID setup up a client (or application in Entra ID terminology), get the tenant id and client id. Create a client secret in Entra ID and copy the value from the Entra ID user interface. Next add upn to the token configuration as optional claim as well as a group claim. Create security groups blackbar-admin, blackbar-developer, blackbar-user and blackbar-patients-document-chat and assign users to them. Get the security group id’s and use them in the apache configuration as group claims. Screenshots of these are shown below - see also documentation on Entra ID alongside mod_auth_openidc here.
Note that if your are in an environment which contains a lot of groups, you might need to use a filter in your EntraID client to limit the groups which are sent to mod_auth_openidc based on a regular expression to avoid too long malformed url’s.
An example of this setup is shown below where a file ´/etc/apache2/options-auth.conf´ is created. If you add ´Include /etc/apache2/options-auth.conf´ to your apache configuration, authentication will be done alongside Entra ID.
export OIDC_PROVIDER_METADATA_URL=https://login.microsoftonline.com/{tenant_id}/v2.0/.well-known/openid-configuration
export OIDC_REDIRECT_URI=https://{deid-apps.yourdomain.eu}/apps/secure
export OIDC_CLIENT_ID=client-id-application-id-from-entraid
export OIDC_CLIENT_SECRET=client-secret-from-entraid-in-client-credentials
export OIDC_CRYPTO_PASSPHRASE=random-string-of-length32-to-encrypt-the-oidc-token
export OIDC_REMOTE_USER_CLAIM=upn
export OIDC_AUTHN_HEADER=remote_user
export OIDC_INFO_HOOK=userinfo
export OIDC_CLAIM_BLACKBAR_ADMIN="claim groups:5cfe050b-82a4-4441-8cfe-bbea93cce8b0"
export OIDC_CLAIM_BLACKBAR_DEVELOPER="claim groups:4dd99544-799f-4180-924d-180e2a7af0d4"
export OIDC_CLAIM_BLACKBAR_USER="claim groups:4bf961c5-e5e7-4bd2-bb61-eb89c4a980b8"
export OIDC_CLAIM_BLACKBAR_PATIENT_DOCUMENT_CHAT="claim groups:93d7e6fe-a90a-452b-8d8f-da2b4b5c0e31"
cat << EOF | sudo tee /etc/apache2/options-auth.conf
  OIDCProviderMetadataURL ${OIDC_PROVIDER_METADATA_URL}
  OIDCRedirectURI ${OIDC_REDIRECT_URI}
  OIDCCryptoPassphrase ${OIDC_CRYPTO_PASSPHRASE}
  OIDCClientID ${OIDC_CLIENT_ID}
  OIDCClientSecret ${OIDC_CLIENT_SECRET}
  OIDCRemoteUserClaim ${OIDC_REMOTE_USER_CLAIM}
  OIDCAuthNHeader ${OIDC_AUTHN_HEADER}
  OIDCInfoHook ${OIDC_INFO_HOOK}
  OIDCScope "openid profile"
  <Location ~ "/apps*">
    AuthType openid-connect
    Require valid-user
    #LogLevel debug
  </Location>
  <Location ~ "/apps/app/rstudio*|/apps/app/vscode*">
    AuthType openid-connect
    Require ${OIDC_CLAIM_BLACKBAR_ADMIN}
    Require ${OIDC_CLAIM_BLACKBAR_DEVELOPER}
  </Location>
  <Location ~ "/apps/app/anonymization-inspection*|/apps/app/pseudonymization-inspection*|/apps/app/blackbar-cockpit*">
    AuthType openid-connect
    Require ${OIDC_CLAIM_BLACKBAR_ADMIN}
    Require ${OIDC_CLAIM_BLACKBAR_DEVELOPER}
    Require ${OIDC_CLAIM_BLACKBAR_USER}
    LogLevel debug
  </Location>
  <Location ~ "/apps/app/blackbar-patients-document-chat*">
    AuthType openid-connect
    Require ${OIDC_CLAIM_BLACKBAR_ADMIN}
    Require ${OIDC_CLAIM_BLACKBAR_DEVELOPER}
    Require ${OIDC_CLAIM_BLACKBAR_USER}
    Require ${OIDC_CLAIM_BLACKBAR_PATIENT_DOCUMENT_CHAT}
  </Location>
  <Location ~ "/inception(?!/api).*">
    AuthType openid-connect
    Require valid-user
  </Location>
  <Location ~ "/automation/prefect*">
    AuthType openid-connect
    Require ${OIDC_CLAIM_BLACKBAR_ADMIN}
    Require ${OIDC_CLAIM_BLACKBAR_DEVELOPER}
  </Location>
EOF
Entry page
If you follow the above approach with Apache, you can download the following entry page below and put it at /var/www/deid-apps/.
If you add the following at the top of your deid.conf you will have the following starting page.
DocumentRoot /var/www/deid-apps/
<Directory /var/www/deid-apps/>
  Options Indexes FollowSymLinks
  AllowOverride None
  Require all granted
</Directory>
RewriteRule ^/home$ /index.html [L]
Right-click to Download the entry page as save it as index.html at /var/www/deid-apps/.